Bacteria project: N64³: --abandoned--

Includes but not limited to: SNES, Genesis, Sega CD, PlayStation 1, Nintendo 64, Dreamcast, Game Gear and I guess the Virtual Boy.

Moderator:Moderators

Post Reply
User avatar
bacteria
Portablizer Extraordinaire
Posts:3984
Joined:Fri Apr 20, 2007 12:14 am
Location:Hampshire, UK
Contact:
Re: Bacteria project: The N64³ system - inc. reduced N64 mobo

Post by bacteria » Sun Mar 08, 2009 4:40 pm

I figured that if logically, on an uncut board, the pink dots in my pic are all connected, then I only need to wire to the pin they end up at, and on the game cart connect that one wire to the four pins on the game cart; same as the four for the yellow and twelve red (ground - after all, ground is ground). The fact they are connected means they share the same contacts. I just have to check that none of the contacts deviate to any other component en-route, which I can easily check - if there is any break, I will have to trace the other contacts and wire them separately - not an issue.

Best way to test is with a game like Super Mario 64 that doesn't use many pins; then a game like Zelda, which I believe uses most of the pins, and see what happens. I have many games in my collection, so if I get it working for say a dozen of the more intensive ones (like Goldeneye, Zelda, Banjo, etc) then all should be fine.

I will test with everything wired but board intact, then cut out the traces to half of the pins, re-test, then all the traces cut out, if still fine, then cut out all the section.

(If) all goes well, hope to complete this in next 18 hours; and have it documented (even if partly documented), so watch this space. As said before, I may well fail, but this, for me, will be a major accomplishment if I can pull it off.

silver - great, follow my work and then have a go yourself! You live in the UK too, yes? I tend to pay about £3 - £5 each for an N64, as you have found out, they are cheap to buy. I personally am not keen on small screens, I like 5" screens - sure, if you have a 3" screen and a small screen board you could have controls on the front of the system, however the system would be even thicker due to the joystick, etc.

I am going to make my system as slim as possible, but it will still be thick as everything is on one level. I have no need to relocate the expansion pack port as I will house my batteries in that space (they have to go somewhere after all). All is planned out, apart from the button placements; which I will have to determine as I build the system.

For a groovy colour, I bought some medium dark red gloss spray paint; i'm going to have the system red and black; and it will of course have a specially made vacuum formed case! :D
Image

User avatar
jjhammerstein
Senior Member
Posts:1562
Joined:Tue Nov 18, 2008 7:15 pm
Location:Southern CT
Contact:

Re: Bacteria project: The N64³ system - inc. reduced N64 mobo

Post by jjhammerstein » Sun Mar 08, 2009 5:03 pm

I want to see how you plan to organize everything inside. You say that the batteries go in the space that the expansion takes up, so is it going to be like this?

------screen
------screen mobo
-- -- batteries and control board
L______ N64

Or something like that?
GET FREE WOW GOLD SEX VISIT MODRETRO


User avatar
Mario
Posts:1383
Joined:Mon Mar 05, 2007 7:20 pm
Location:Sunny California

Re: Bacteria project: The N64³ system - inc. reduced N64 mobo

Post by Mario » Sun Mar 08, 2009 5:28 pm

Image

Yay, Bacteria's working on another N64 project! :mrgreen:
I can't WAIT for updates! Your worklogs are the best! ^_^
Image

User avatar
themadhacker
Senior Member
Posts:2670
Joined:Wed Aug 06, 2008 7:53 pm
Location:ohio

Re: Bacteria project: The N64³ system - inc. reduced N64 mobo

Post by themadhacker » Sun Mar 08, 2009 6:24 pm

I agree. I think it's great how you take the time to take pictures of and document every step. I mean, with the Into Play, you updated about twice a day.
rest in peace, Ronnie James Dio! \m/

User avatar
thewise1
Portablizer Extraordinaire
Posts:1413
Joined:Sun Jan 04, 2009 8:18 pm
Location:Sitting on my pile of authentic minnesota dirt

Re: Bacteria project: The N64³ system - inc. reduced N64 mobo

Post by thewise1 » Sun Mar 08, 2009 6:29 pm

I wonder though if he'll ever do the gamecube or a more modern console. It'd be fun to see what he can do.
ImageImageImageImageImageImage

User avatar
palmertech
Senior Member
Posts:3225
Joined:Sat Feb 02, 2008 1:40 am
Location:California, land of the homeless and hippies
Contact:

Re: Bacteria project: The N64³ system - inc. reduced N64 mobo

Post by palmertech » Sun Mar 08, 2009 9:10 pm

U WIL PHAIL. :wink:

Darn it Bacteria, now I will never make the smallest. :lol:

How in the world will you be able to grip it? Won't your hands cover the screen, not to mention the fact that you will have to learn to game in reverse?
Image

Excellent

User avatar
bacteria
Portablizer Extraordinaire
Posts:3984
Joined:Fri Apr 20, 2007 12:14 am
Location:Hampshire, UK
Contact:

Re: Bacteria project: The N64³ system - inc. reduced N64 mobo

Post by bacteria » Mon Mar 09, 2009 3:10 am

jjhammerstein - The batteries are about 16-17mm thick as I recall, once removed from their shells. They have to go somewhere, so I figured I could rest them on top of the chips (and 4mm heatsinks), there is space potentially for 3 sets of cells, certainly 2 sets; so that means 4amps or 6amps. I will be cutting just under the expansion pack port, so space. The height of the batteries will cover the height of the trimmed expansion pack and save the hassle of relocating it. If I can make the N64 board 90x90mm, then there is space on the sides also for d-pad and PSP joystick to be mounted - that is the aim.

Mario - Actually, two N64's and one TurboGrafx to be exact. The N64 for my case barely needs any trimming at all, just a tiny bit off the corners, that is all. I figured as people are awaiting to see how the N64 looks in my case I would make one; may as well run that alongside the TurboGrafx project so I can spray paint both sets of cases at the same time. Firstly, let's see if I can trim the N64 board right down or not! Thanks for your comments on my worklogs, will document this board trimming, until it fails or works - even if it fails, it should hopefully provide interesting reading.

themadhacker - Thanks. I like to document frequently!

thewise1 - Yes, definitely - will do a GameCube and Dreamcast, might see if I can reduce the Saturn board down too at some point, will certainly trim down the Amstrad GX4000 board in about 3-4 projects time. I have a lot of projects in the pipeline. Like Life of Brian, I seem to spend my time making a system rather than playing games on it afterwards - that has to change, I have masses of unplayed games! :roll:

palmertech - You have no way to know if I will fail or not - don't go wishing that on me mate! If I pull this off, there will not be a smaller N64 system made, period. The case will be to the edge of the screen itself (with the metal tabs removed, of course), so flush.

To hold the system, cup your hands together with finger ends touching (not thumbs), you get the idea. The system will be supported well that way, and leave both thumbs to work the joystick and d-pad on the left, A and B on the right, it is easy to operate left and right if controls are on the sides, not on back - so you don't need to learn to play in reverse, however the shoulder buttons, Z and C buttons will have to be controlled by fingers on the back of the system, blindly. I can touch type on a keyboard fine, as I am doing at the moment BTW, so it is the same principle - if the buttons are in the right places you can find them without looking. That part of the case design and implementation will be one of the hardest parts of this project, potentially.

Anyway, onto project work - expect updates later! :D
Image

User avatar
bacteria
Portablizer Extraordinaire
Posts:3984
Joined:Fri Apr 20, 2007 12:14 am
Location:Hampshire, UK
Contact:

Re: Bacteria project: N64³ - WIP: smallest N64 in world or bust!

Post by bacteria » Mon Mar 09, 2009 5:14 am

Decided to make this a WIP, whilst it works; so as the title says, "smallest N64 in world or bust" - I think that is apt! :lol:


So, onto the WIP:

Three battery packs would be a bit on the heavy side, so decided to go for two. If using two packs, thought I would rip open one of the double height Canon BP-911 cells I used before on my Multi-Platform system; I have 4 cells, only need 2, so let's use one! The pics are blurry, but basically they are 7.4v and 4.4amps. Given that 8.8amps powered my Multi-System with the N64 for (as I recall) just under 7 hours continuously, this system should run for around 3.25 hours or thereabouts; which is perfectly fine.

Lift up the positive and negative pins after snapping off the corners of the casing with heavy pliers to access the strips. Use a screwdriver to pry up the casing halves.

Image

Then pry up the shorter part.

Image

Use clippers to weaken the casing and use pliers to bend back the plastic to break the cells free from the casing. Be careful not to damage the cells.

Image

Result. Notice, the protection circuitry is double height.

Image

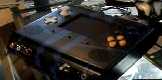
For purpose of illustration, I put a 4mm tall VGA memory heatsink on one of the RAM chips; the main processor chips are a bit taller of course, by a couple of millimeters. As you see, when the expansion pack is trimmed down (by about 2-3mm) the top of the batteries will be level - this is why there is no point relocating the expansion pack - no advantage, the batteries have to be somewhere of course!

Image

As daftmike said before, it is hard to do a WIP on the wiring as you can either use a multimeter or you can't; however I will give pointers - use kynar wire, it is thin, single strand and strong - IDE cable often breaks easily and isn't normally obvious that there is a problem. I am keeping the wiring fairly short, approx 3.3 inches long, although some wires will be a bit shorter and some maybe a bit longer - trying to keep them about the same, however in order for the game cart to be visible with the game graphics showing, the cart had to be inverted.

Its taking a long time to wire, much longer than anticipated, as the soldering is really fine. After each wire is connected, it has to be checked there are no shorts too.

The yellow wires are all grounds, going to wire those up last. To make the wiring a bit tidier, I use thin pliers to bend some of the pins on the cart slot together if they shared common connections.

Image

Continuing to solder more wires, back later! It is very tiring on the eyes to do such fine soldering work, so this will take longer than originally thought - need to take frequent breaks or I go a bit "boggle eyed".

Decided to test board slicing with another board first, when I am ready for that stage, as it would be depressing to destroy the board after getting the cart relocation working! :roll:

UPDATE: - Boy, this is mentally really tiring, having to concentrate on such tiny contacts. Anyway, got a few of the wires done. They are all right next to each other - if you look at the chips on an N64 board, you see how small the areas are!

I have a system, try and wire adjacent wires to the corresponding pins on the cart slot, rather than the other way around; otherwise it would be amazingly hard to solder a wire between two existing wire connections. I put a black dot on the outer side of the cart slot to indicate they are connected.

Image

UPDATE 2: 50% done. Had minor scream when a tiny blob of solder attached one pin I was joining to a neighboring pin, towards the top of the pin itself. Fortunately, managed to resolve with some thin desoldering braid. It was a bit touch and go though! This fine soldering is fairly straightforward, but not for the fainthearted, that's for sure. Doing well though with my £4 cheapie pencil tipped 30w iron! :lol:

UPDATE 3: 100% done. Only need to wire the ground to the board. Couldn't work out where pin 46 went, looked at daftmike's pinout and saw that pin doesn't go anywhere! Nice to have confirmation!!

Image

Looks messy. Hoping to get wires shorter if I can, but first things first. Tomorrow I will check my connections, then cross fingers and test to see if all works or not. Project will either then be dead before it starts or continue to the next stage! :D Hoping the kynar wire proves suitable for such work - mind you, daftmike is using IDE cable, so I should be hopefully ok.

Fingers crossed for tomorrow!
Image

User avatar
palmertech
Senior Member
Posts:3225
Joined:Sat Feb 02, 2008 1:40 am
Location:California, land of the homeless and hippies
Contact:

Re: Bacteria project: N64³ - WIP: smallest N64 in world or bust!

Post by palmertech » Mon Mar 09, 2009 11:11 am

Looking good!

Okay, so only a few buttons will be on the back; I thought you were going to put them all there! :wink:

And I wish you the best luck, Bacteria. That earlier post was just raw jealousy talking. :lol:
Image

Excellent

User avatar
daftmike
Posts:51
Joined:Wed May 24, 2006 1:16 pm
Location:UK
Contact:

Re: Bacteria project: N64³ - WIP: smallest N64 in world or bust!

Post by daftmike » Mon Mar 09, 2009 11:58 am

Good work so far, hope it all goes well, it's nice to see your progress updated so often.

You should be fine with the wire you used, mine were only extended 35mm from where the cart slot used to be, I may end up replacing them with something more flexible, the ide stuff was all i had to hand at the time.

User avatar
64M320N3
Posts:790
Joined:Wed Apr 16, 2008 5:27 pm
Location:Ft. Collins

Re: Bacteria project: N64³ - WIP: smallest N64 in world or bust!

Post by 64M320N3 » Mon Mar 09, 2009 2:43 pm

I love your WIPs!
Keep it up!
Making stuff with my new beautiful CNC machine!
Would you like a professional looking custom case for your portable? I may be able to help you. Check out this link:
http://forums.benheck.com/viewtopic.php?f=13&t=32724

User avatar
bacteria
Portablizer Extraordinaire
Posts:3984
Joined:Fri Apr 20, 2007 12:14 am
Location:Hampshire, UK
Contact:

Re: Bacteria project: N64³ - WIP: smallest N64 in world or bust!

Post by bacteria » Mon Mar 09, 2009 3:43 pm

Thanks guys!

Great to see a skilled modder like daftmike on this forum. He is obviously good at electronics, which I am not - I am good with a soldering iron and multimeter and dremel!

Incidentally daftmike, you mention slicing the board should be fine as long as I avoid the "high speed traces", I presume these are the ones between the main processors and RAM, which I was going to avoid anyway? The space I was going to slice the board before is riddled with wiring now, so out of the question. It is hard to find a channel on both sides of the board I can slice, but will have to find a way. This process will take a fair bit of time and work to achieve.

I am going to test my system tomorrow in three phases:

1) as is at the moment, as long as all the wiring is as good as I hope it is, all will work.
2) gauge out trace connections not needed from the old wiring, re-test. If all is ok, then the game cart is only connecting via my wiring fine.
3) remove the section and retest.

I noticed that the 12v line from the cart slot has to connect to two capacitors on the back of the board, if you look in the pic above I posted, you will see I bore a hole through the board (in a ground area on both sides of the board) and put the wire through to the back to solder to the capacitor in question. daftmike I think has his cart on the back of his board, mine is at the front; so the order of wiring is opposite BTW.
Image

User avatar
Skyone
Moderator
Posts:6390
Joined:Tue Nov 29, 2005 8:35 pm
Location:it is a mystery
Contact:

Re: Bacteria project: N64³ - WIP: smallest N64 in world or bust!

Post by Skyone » Mon Mar 09, 2009 4:05 pm

If you're going for size, why are you using cylindrical batteries? I'd recommend flat Li-Poly. Also, will this really be the smallest N64p? I thought it was going to be cube-shaped, which is a lot thicker than a lot of ones out there.

User avatar
64M320N3
Posts:790
Joined:Wed Apr 16, 2008 5:27 pm
Location:Ft. Collins

Re: Bacteria project: N64³ - WIP: smallest N64 in world or bust!

Post by 64M320N3 » Mon Mar 09, 2009 4:22 pm

bacteria wrote:3) remove the section and retest.
Do you mean the part where the cart slot was originally?
Also, Lipolys are better, like Skyone said.
Making stuff with my new beautiful CNC machine!
Would you like a professional looking custom case for your portable? I may be able to help you. Check out this link:
http://forums.benheck.com/viewtopic.php?f=13&t=32724

User avatar
bacteria
Portablizer Extraordinaire
Posts:3984
Joined:Fri Apr 20, 2007 12:14 am
Location:Hampshire, UK
Contact:

Re: Bacteria project: N64³ - WIP: smallest N64 in world or bust!

Post by bacteria » Mon Mar 09, 2009 4:24 pm

Was thinking about Li-po, however the ones I have seen aren't much thinner, and often too long. Thinner ones would be nice of course. Thought I would get everything else working first before looking more into it - no point wasting money if I can't get the boards working. Have you suggestions for 7.4v or 7.2v Li-pos, thin, good amperage and smaller than a PSone screen please?

Smallest in terms of the footprint (front), as the plan is to make it literally the size of the PSone screen itself with tabs removed. It can't be the thinnest by any stretch of the imagination; smallest (length and breadth) yes, thinnest (height) no.

64M320N3 - Yes.
Image

Post Reply